Creating a Z-Ray Plugin for Zend Server 8.5
Zend just released version 8.5 of their Zend Server application server. A major part of this release is the plugin gallery, which provides an App store for Zend Server extensions. These extensions can add application-specific debugging features to the Z-Ray Debugger. We've built one such extension specifically for Concrete5. It didn't take long – just a day or two. That said, there were some bumps in the process, as you're working on a platform for which the documentation hasn't quite caught up yet. With that in mind, I'm going to share my process for building the Concrete5 Z-Ray plugin, in the hopes that it might help someone who is building their own Z-Ray plugin for Zend Server. Good luck!
Get the Documentation
There is good documentation for the Z-Ray platform, it's just a little scattered. Here are some good docs that I found.
- Zend Server Plugins Documentation @ GitHub
- Develop Your First Zend Server Plugin – focuses on Wordpress, but useful nevertheless.
- Zend Server Video Gallery
Create Your Directory
Make a new empty directory. The name isn't that important – I chose "concrete5_zray_plugin"
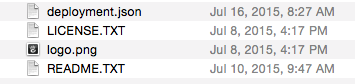
Place the deployment.json file in the directory
The development.json file describes your Zend Server plugin, including its name, a logo, what it contains, its dependencies and more. Here is a detailed description of what should be in this file.. Here's what mine contains.
{
  "name" : "concrete5",
  "display_name" : "Concrete5",
  "version" : "1.0.0",
  "type": ["zray"],
  "logo": "logo.png",
  "eula": "LICENSE.TXT",
  "readme": "README.TXT",
  "dependencies": {
    "plugin": {
        "min": "1.0.0"
    }
  }
}
Here's the breakdown.
- name: Obviously, this is the name of the plugin.
- display_name: The name as it ought to be displayed within Zend Server's dialog screens.
- version: The verison number of the plugin.
- type: What type of plugin this contains. This could be zray, routing or both (as a JSON array.) A routing plugin (as opposed to a Z-Ray plugin, which is what we're creating here) provides detailed information to the Zend Server URL Insights feature to document when controller methods are firing, based on URLs. More information on building these types of plugins is available here.
- logo: A relative path to a logo. Mine is "logo.png". We'll have to create this logo in a moment.
- eula: A relative path to a license agreement.
- readme: A relative path to a readme document.
- dependencies: This is an array of JSON objects that document the dependencies of this plugin. You can use this to specify the minimum version of plugin, required libraries and more. Full documentation is available in the Zend deployment.json documentation.
Add Additional Items specified by deployment.json
Now that we have a deployment.json file to describe our Z-Ray plugin, we need some of the items we specified in the file. These include the readme file (README.TXT), the license file (LICENSE.TXT) and the logo (logo.png) Add these three files to the same directory that you placed deployment.json in. The files inside the "concrete5_zray_plugin" directory should now look like:
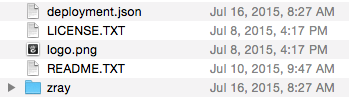
Add the Z-Ray specific Directory
Next, add a directory named "zray" to the top level inside your plugin. This is where code and templates used by your Z-Ray plugin will live. Here's how the directory structure looks now.
Create the Z-Ray PHP Class
Every Z-Ray plugin has a PHP file in its zray/ directory that defines when it should run (i.e. during which methods of your application's classes it should trace.) This file is named "zray.php". It can be structured and namespaced in whatever way you'd like – just know that it will automatically be included and executed when your plugin is enabled. Here's what the Concrete5 plugin looks like (with some lines snipped so we can talk about them later.)
<?php

namespace Concrete5;

class Zray
{
// snipped for later
}

require __DIR__ . '/objects.php';

// Create new extension - disabled
$zre = new \ZRayExtension('concrete5');

// set additional data such as logo
$zre->setMetadata(array(
    'logo' => __DIR__ . DIRECTORY_SEPARATOR . 'double_logo.png',
));


$concrete5 = new Zray();

// start tracing only when 'your_application_initial_method' is called, e.g. 'Mage::run()'
$zre->setEnabledAfter('Concrete\Core\Application\Application::checkPageCache');

// start everything
$zre->traceFunction('Concrete\Core\Application\Application::checkPageCache', array($concrete5, 'start'), function() {});


// trace config values checked and what their value was
$zre->traceFunction('Illuminate\Config\Repository::get', function() {}, array($concrete5, 'onAfterGetConfigValue'));

// trace blocks
$zre->traceFunction('Concrete\Core\Page\View\PageView::startRender', array($concrete5, 'onBeforePageRender'), function() {});

// trace block render time
$zre->traceFunction('Concrete\Core\Block\View\BlockView::start',
    array($concrete5, 'onBeforeBlockRender'), function() {}
);
$zre->traceFunction('Concrete\Core\Block\View\BlockView::finishRender',
    function() {}, array($concrete5, 'onAfterBlockRender')
);

// trace page requests
$zre->traceFunction('Concrete\Core\Page\Page::getByID', function() {}, array($concrete5, 'onAfterGetPage'));
$zre->traceFunction('Concrete\Core\Page\Page::getByPath', function() {}, array($concrete5, 'onAfterGetPage'));

// Finish method - aggregates things that need aggregating
$zre->traceFunction('Symfony\Component\HttpFoundation\Response::send', array($concrete5, 'onAfterDispatch'), function() {});
Some notes:
- You'll notice my file is named "Concrete5." I don't the file needs to be namespaced, or if it is namedspaced that that namespace has to conform to anything. I just chose Concrete5 because it made sense.
- Next, we have a class named Zray. This class is the one I'm going to use to hold all of my tracking methods – but again, it could be named anything. Or you could not have a class at all. We'll get to this class later.
- We include the file "objects.php" in the same directory. This is a PHP class that holds some auxiliary objects that I use for tracking Concrete5-specific data. This isn't a requirement of the plugin, this is simply an implementation detail of my particular plugin.
- Next, we create an instance of the \ZrayExtension plugin, with a particular name. I believe this name needs to match the name of the plugin in the deployment.json file. Next, we set some metadata about the plugin, including its logo. This is a path to the current zray/ directory. This means our plugin is expecting a file named double_logo.png in the zray/ directory. Why have I named this double_logo.png? More on this later.
- Now, we register some methods that will be run at various points in Concrete5. We're hooking into a number of places in Concrete5 in order to populate the various panels that our Z-Ray plugin offers. How you hook into your application is completely up to you. The aforelinked documentation also does a good job of detailing how the traceFunction and setEnabledAfter methods work.
Notice that all these tracing functions are taking their callable in the format of an array, with the first item being a PHP object (the instance of the Concrete5\Zray class that we defined earlier, and instantiated into the $concrete5 object), and the second being a method in the Concrete5\Zray class.)
The Logo
What's the deal with double_logo.png? Well, the logo passed to the Zray extension object is actually a PNG with a special form factor. The top half of the PNG is the logo that you want to show in the tab at all times, and the bottom half is the highlighted version that ought to show up when the tab is active (e.g. blue). It's a sprite. This is what mine looks like:
![]()
Since this is a background image, positioning is important. The logo dimensions should be 24x48.
Basic Panel Details: The Pages Panel
The easiest way to continue documenting this is to check out how I built a couple of the panels. Let's look at the pages panel, for example:
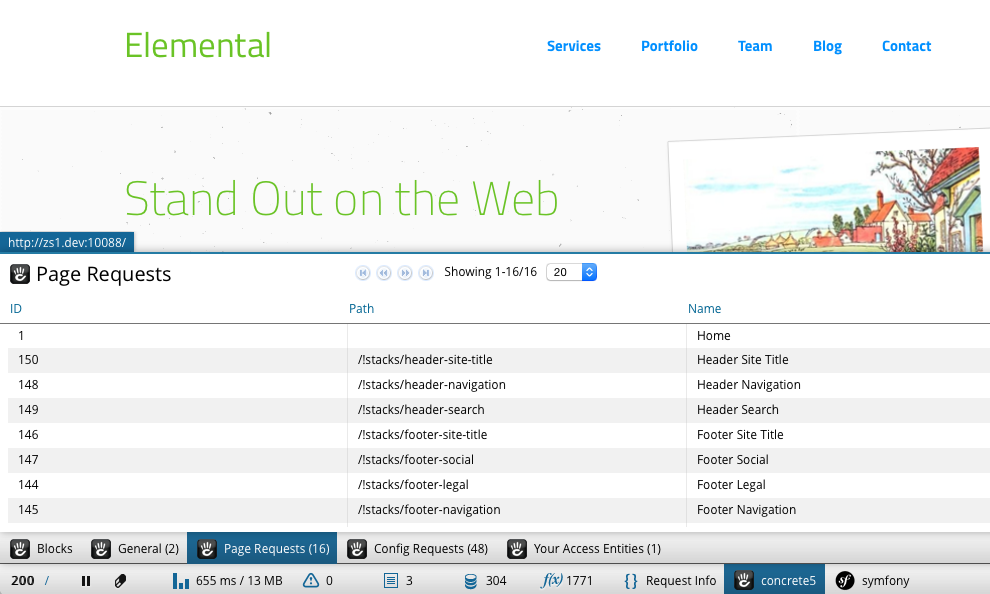
There are two methods defined in the zray.php file that populate this panel.
// trace page requests
$zre->traceFunction('Concrete\Core\Page\Page::getByID', function() {}, array($concrete5, 'onAfterGetPage'));
$zre->traceFunction('Concrete\Core\Page\Page::getByPath', function() {}, array($concrete5, 'onAfterGetPage'));
Notice that both of these traces use the same method: onAfterGetPage, which is found on the $concrete5 object, which is an instance of the Concrete5\Zray class. Also note that the second argument to traceFunction is empty, while the callable is the third argument. This means that the onAfterGetPage method will run after the getByID and getByPath methods, not at the start of them.
If we dig into the Concrete5\Zray class, this is onAfterGetPage:
public function onAfterGetPage($context, &$storage)
{
    // store data to storage that later on will be displayed in panels
    if ($context['returnValue']) {
        $c = $context['returnValue'];
        $cms = \Core::make('app');
        $statistics = $cms['zray/statistics'];
        $statistics->recordPage($c);
    }
}
The first few lines of this are straightforward. We grab the return value of this function (found in the $context argument), which will be the page that is returned by Page::getByID or Page::getByPath(). But what is this?
$cms = \Core::make('app');
$statistics = $cms['zray/statistics'];
$statistics->recordPage($c);
We have used the Concrete5 class container to store a new pointer to something we're using just for our Z-Ray plugin, "zray/statistics". This is defined within the start() method of our Zray plugin:
public function start()
{
    $cms = \Core::make('app');
    $cms->bindShared('zray/statistics', function() {
        return new ZrayStatistics();
    });
}
the bindShared() method ensures that every time we grab this class through the class container, we're getting the same instance of it, and if we update it, we're adding on to it and updating the same instance. The start() method of the Zray class isn't something automatically run, though – it's something we forced to run early in the bootstrapping process by hooking into an early Concrete5 method:
$zre->traceFunction('Concrete\Core\Application\Application::checkPageCache', array($concrete5, 'start'), function() {});
Why do we have to jump through all these hoops? It's important to note that the same instance of the Zray class is not going to be available through all the traced functions. This is normally fine – in many cases you can simply return your data from your traced functions in the $storage array and build your panels that way (refer to the Zend documentation for more details about this.) But in my case I wanted to track functions and how they worked over the entire page request. For example, I wanted to know how many times a particular page was requested during the given page load, and I wanted to group by these pages, rather than just spit the data out in a lengthy list. That's why I created the zray statistics class and stored it using Concrete5's own class container.
The ZrayStatistics class is a simple class found in the objects.php include. Here's what the relevant methods in that class look like.
class ZrayStatistics
{
    protected $pages = array();
    public function recordPage($c)
    {
        $page = new ZrayPage($c);
        $this->pages[] = $page;
    }
    /**
     * Loop through all the requested pages and aggregate them by count, returning just an array of ZrayRequestedPage
     * objects (with counts)
     * @return array
     */
    public function getRequestedPages()
    {
        $requestedPages = array();
        foreach($this->pages as $page) {
            if (isset($requestedPages[$page->getCollectionID()])) {
                $zrayPage = $requestedPages[$page->getCollectionID()];
                $zrayPage->setCount($zrayPage->getCount() + 1);
            } else {
                $requestedPages[$page->getCollectionID()] = new ZrayRequestedPage($page);
            }
        }
        return $requestedPages;
    }
}
This should be pretty self-explanatory. Every time a Concrete5 page is rendered, we create a single, shared instance of the ZrayStatistics class. Every time a page is requested by either ID or path we grab this shared instance and note the requested page via recordPage.
But how do we get this data to the plugin itself? At the very end of runtime we hook into the final method, and grab all the data to build our panel:
$zre->traceFunction('Symfony\Component\HttpFoundation\Response::send', array($concrete5, 'onAfterDispatch'), function() {});
Our onAfterDispatch() method is pretty self-explanatory (additional code snipped for review purposes):
public function onAfterDispatch($context, &$storage)
{
    $cms = \Core::make('app');
    $statistics = $cms['zray/statistics'];
    foreach($statistics->getRequestedPages() as $page) {
        $storage['pageRequests'][] = array(
            'ID' => $page->getCollectionID(),
            'Path' => $page->getCollectionPath(),
            'Name' => $page->getCollectionName(),
            'Total' => $page->getCount()
        );
    }
}
The $storage array is finally used to build out the paths, as per the typical Z-Ray documentation. Since we've used the same instance of the statistics class throughout the entire request, our plugin aggregates the data nicely.
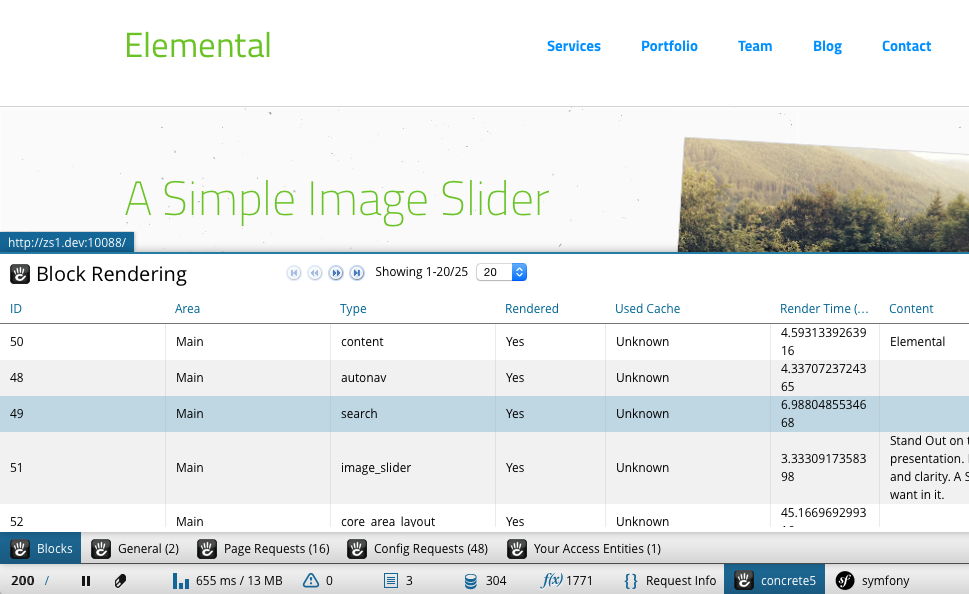
Advanced Panel Details: The Blocks Panel
While our example is a little challenging, due to the usage of shared classes and the desire to aggregate data across the lifecycle of the entire Concrete5 request, there was nothing custom about the actual panel that is finally created in the onAfterDispatch method. But what if we want to do something custom with the output of the panel itself? We do, in the blocks panel:
First, Populate Z-Ray with your Data
Custom panels are really only custom on the front-end. On the backend they operate the same way as other panels – you send data into the $storage array. Here's how our blocks panel sends data into the view layer. First, we trace block data when block rendering begins and ends:
$zre->traceFunction('Concrete\Core\Block\View\BlockView::start',
    array($concrete5, 'onBeforeBlockRender'), function() {}
);
$zre->traceFunction('Concrete\Core\Block\View\BlockView::finishRender',
    function() {}, array($concrete5, 'onAfterBlockRender')
);
Lets look at these methods:
public function onBeforeBlockRender($context, &$storage)
{
    $data = $context['this']->getScopeItems();
    if ($data['b']) {
        $b = new RenderedBlock();
        $b->setID($data['b']->getBlockID());
        $b->setType($data['bt']->getBlockTypeHandle());
        $b->setStart(microtime(true));
        $b->setAreaHandle($data['b']->getAreaHandle());
        $cms = \Core::make('app');
        $statistics = $cms['zray/statistics'];
        $statistics->recordRenderedBlock($b);
    }
}
Before a block is rendered, we hook into the current object, and retrieve its scope items (this is a concrete5 method.) Then we instantiate a RenderedBlock object, which is a custom object that we're using to store data about blocks rendered on a page. This is part of our plugin, found in the objects.php include file. We set the start of rendering, and then we store that RenderedBlock object within the shared statistics class, just like we did for page requests.
After a block is done rendering, we retrieve the relevant block, and mark its rendering time as completed:
public function onAfterBlockRender($context, &$storage)
{
    $end = microtime(true);
    $data = $context['this']->getScopeItems();
    if ($data['b']) {
        $cms = \Core::make('app');
        $statistics = $cms['zray/statistics'];
        $block = $statistics->getBlockByID($data['b']->getBlockID());
        $block->setEnd(microtime(true));
        if (version_compare(\Config::get('concrete.version'), '5.7.5a1', '>=')) {
            $block->setUsedCache($context['this']->usedBlockCacheDuringRender());
        }
        $controller = $data['b']->getController();
        if (is_object($controller) && method_exists($controller, 'getSearchableContent')) {
            $block->setContent(strip_tags($controller->getSearchableContent()));
        }
    }
}
Next, we store data about the block, including whether it used the cache during render, and its content (in order to help you locate the block on the page.)
Finally, in onAfterDispatch, we send this data into the panel:
public function onAfterDispatch($context, &$storage)
{
    $cms = \Core::make('app');
    $statistics = $cms['zray/statistics'];
    $renderedBlocks = array();
    foreach($statistics->getBlocks() as $block) {
        $usedCache = 'Unknown';
        if (version_compare(\Config::get('concrete.version'), '5.7.5a1', '>=')) {
            $usedCache = $block->getUsedCache();
        }
        $renderedBlocks[] = $block->getID();
        $storage['blockRender'][] = array(
            'bID' => $block->getID(),
            'type' => $block->getType(),
            'area' => $block->getAreaHandle(),
            'cache' => $usedCache,
            'content' => $block->getContent(),
            'time' => $block->getDisplayRenderTime(),
            'rendered' => true
        );
    }
}
We could be done right here – but we want to actually add some custom markup and CSS to the block render panel. For example, if the block in the list wasn't actually rendered on the page, we wanted to note this in red. To do this we're going to need some custom behaviors in the panel.
First, create a directory named Panels in the zray directory. This directory holds any custom templates used by your plugins panels. Since the panel I want to have control over is our blocks panel, I'm going to name the template in this directory blocks.phtml.
Next, create a file named Module.php in the zray directory. This is a special PHP class that specifies certain presentational details about your Z-Ray plugin. Here's the contents of mine:
<?php
namespace Concrete5;
class Module extends \ZRay\ZRayModule
{
    public function config()
    {
        return array(
            'extension' => array(
                'name' => 'concrete5',
            ),
            'defaultPanels' => array(
                'blockRender' => false
            ),
            // configure all custom panels
            'panels' => array(
                'blocks' => array(
                    'display'       => true,
                    'logo'          => 'double_logo.png',
                    'menuTitle'     => 'Blocks',
                    'panelTitle'    => 'Block Rendering',
                    'searchId'      => 'block-table-search',
                    'pagerId'       => 'block-table-pager'
                )
            )
        );
    }
}
The Module class must extend the \Zray\ZrayModule class. The config() method must be defined. It's extension['name'] configuration value must point to the name of your plugin as defined in deployment.json. Next, we define something called defaultPanels. This was a little confusing to me, but here goes: when we finally get around to building our blocks panel, the data that we're sending into the view would normally create a panel named "blockRender." That's because that's the array key we're using to hold all this panel data in our $storage variable (see above). However, we don't want to use the automatically created 'blockRender' panel to show this data, because we're creating a custom panel to do it instead. So we hide the automatically created blockRender panel.
Next, we create our custom panel using the values found in $panels['blocks']. Information on how to structure this can be found in the Zend Server API Data Display Documentation.
Note the name of our panel, "blocks." This must exactly match our template in the Panels/ directory, which it does (panels.phtml.)
Our blocks.phtml file follows the standards of Zend ViewScript as documented in the above documentation, but it can be helpful to look through a few things.
First, we create a five column data grid with the zray-table-blocks ID.
<?php
$tableParams = array(
    'tableId'           => 'zray-table-blocks',
    'tableWidth'        => '5',
);
?>

<?php echo $this->zrayTable($tableParams);?>
Next we begin populating it with data.
var storage = zray.getStorage('blockRender');
var maintable = zray.createTable(storage, jQuery('#<?php echo $tableParams['tableId']; ?>'));
maintable.setColumns([
    {
        "label": "ID",
        "propertyName": "bID",
        "sortable": true,
        "width": '15%',
        "getHtml": function(value, record) {
            return value;
        }
    },
The "blockRender" key above is important. This key must be present in our PHP $storage array that we return during the server-side portion of Z-Ray debugging. You can see it present in onAfterDispatch.
setColumn is pretty straightforward. ID represents the visible name of the column in the table, whereas propertyName represents the key as defined within our $storage array above. When we get to our "Uses cache" column you can see how we use the custom markup:
{
    "label": "Rendered",
    "propertyName": "rendered",
    "sortable": false,
    "width": '10%',
    "getHtml": function(value, record) {
        if (value) {
            return 'Yes';
        } else {
            return '<strong style="color: #f00">No</strong>';
        }
    }
},
Pretty straightforward. Finally, we have to create pagination for the table, and register its storage:
// create pager and search
zray.createPager(storage, jQuery('#<?php echo $params['pagerId']; ?>'));
zray.createSearch(storage, jQuery('#<?php echo $params['searchId']; ?>'), maintable);

zray.registerDataHandler('concrete5', 'blockRender', function(extensionData, requestData) {
    storage.setData(extensionData);
});
Important Note: Interactivity with the Client Application from a Z-Ray Panel
Originally, I wanted a custom panel because I wanted custom JavaScript to run on the page. For example, I wanted it so that any time you moused over a block in the list, that actual block in the Concrete5 page would highlight. Unfortunately, this does not appear to be possible. The Z-Ray panels themselves operate in an iframe completely separately from the page that they're inspecting, which means that JavaScript cross-site-scripting rules keep you from communicating between the host application and the Z-ray instance. (Note: Zend, please correct me if I'm wrong – preferably with examples ;-) )
Conclusion
There's a lot to the Concrete5 Z-Ray plugin, but all the additional functionality builds on these examples. You can access the full plugin at our Zend Server Plugins GitHub repository. I hope this helps those who develop Concrete5 sites and applications on the Zend Server platform, as well as any PHP developer curious about the new Z-Ray plugin functionality introduced in Zend Server 8.5. Good luck!